Running a Model
To run a model, with a project loaded click the from the LUPTAI Menu. This opens the Run Model Dialog which provides the user with interface for setting up a model run. The dialog has a number of tabs which can be navigated between by clicking the top of the tab you wish to navigate to or the “Next” and “Previous” buttons.
The Model Details
The first tab is the “Model Details” tab, which is for specifying what scenario the run is to be performed using and the name to be given to the results set.
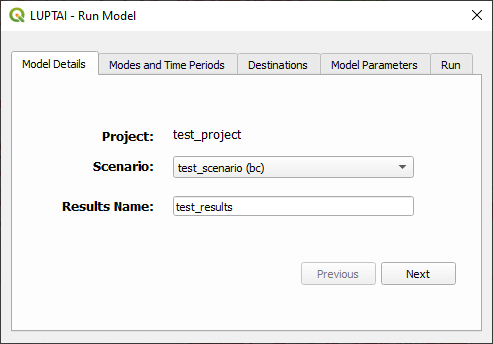
The Model Details tab of the Run Model Dialog.
Note
Ensure that the scenario you are using has all the data you need prior running, such as the correct public transport and activity data. For details on getting this data see Importing Model Data
Selecting Modes
Every LUPTAI model run require at least one mode of transport to be specified, which can be done from the “Modes and Time Periods” tab. The user can select walk, cycle, or public transport (the car mode is unavailable in this version of the LUPTAI Plugin). Selecting multiple modes allows LUPTAI to perform multiple model runs simultaneously, one for each mode.
For Public Transport, LUPTAI models how a commuter gets to and departs from public transport stops (the access and egress modes). This can be either active modes (walk or cycle) and is chosen based on what active modes, following this paradigm:
If a single active mode is selected then that active mode will be used as the egress mode.
If both active modes are selected then two PT model runs will be performed, each using egress modes.
If no active mode is selected then the egress mode will be walk.
When Public Transport is selected, the user may then select what public transport modes to use in the model run, by default this is all PT modes available in the scenario.
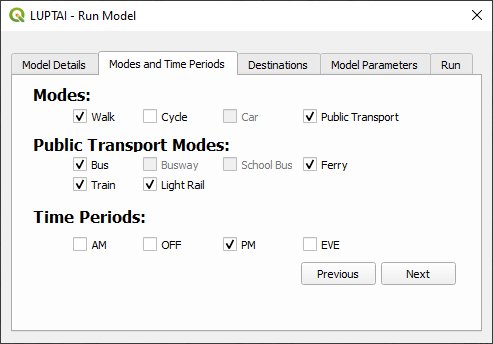
The Modes and Time Periods tab of the Run Model Dialog.
Selecting Time Periods
- The user may choose from four different time periods using the “Modes and Time Periods” tab:
AM (morning peak)
OFF (during day, between morning and evening peak)
PM (evening peak)
EVE (during night, between evening and the next days morning peak)
For any model run, at least one time period must be supplied.
Note
The time period selected only affects the public transport mode model runs, as active mode model runs depend on the active network which is static.
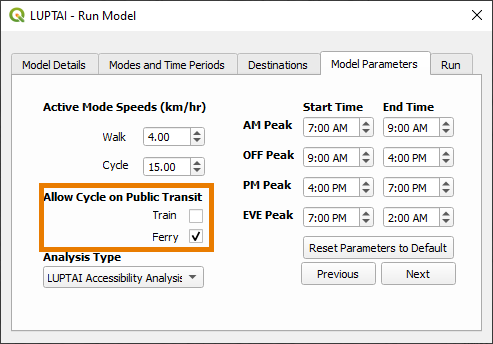
The time that each time period covers can be modified in the peak time editing section of the “Model Parameters” tab.
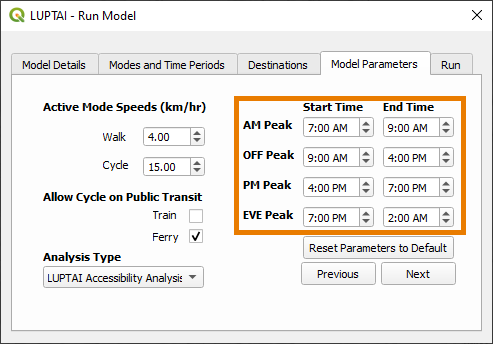
The Model Parameters tab of the Run Model Dialog, with peak time editing section highlighted.
Selecting Destinations
LUPTAI has three destination categories: General Activities, Employment Activities, and PT as Activities. All destination selections can be modified through the “Destinations” of tab of the Run Model Dialog.
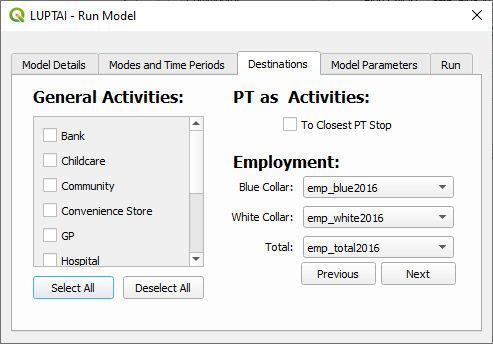
General Activities
General Activities are points of interest and are contained in the Activities Points Table, all activities that are present in the table are shown in the General Activities list of the Destinations tab. To select general activities to include in the model run, check the checkbox next to that activity.
Note
Each general activity has an “exclusion probability” that effects the accessibility score, based on how likely a commuter is to be satisfied with any given choice of POI. These exclusion probabilities are calibrated and, currently, can not be modified in using the QGIS plugin. However, these can be modified when using the API, by making changes to the parameters file To not use exclusion probabilities in an analysis see Changing Analysis Type.
PT as Activities
This activity uses PT Stops as a possible destination, similar to as if they were general activities (but with no exclusion probabilities). You must have either walk or cycle selected to choose this activity.
Note
Because the model applies different methodology to calculating accessibility, compared to general activities and employment, it produces the results separately to these. The result layers for PT as Activities are suffixed as “<mode> To PT”.
Employment
The LUPTAI QGIS Plugin allows the user to perform accessibility analysis on three categories of employment: Blue Collar, White Collar, and Total. The data for these categories is supplied by the user in the Activities Attributes Table.
For each category the user wishes to perform accessibility analysis of, the user must specify, in the associated drop down box, which column of the activities attributes table to use for that category.
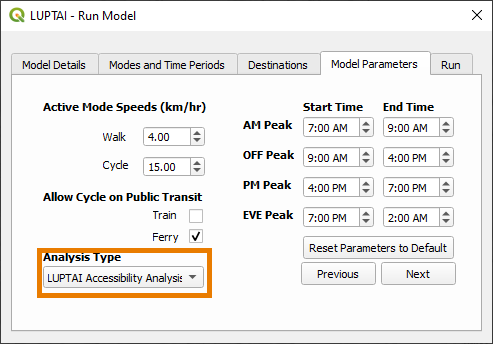
Changing Analysis Type
The LUPTAI Model includes a concept of “exclusion probabilities”, these encode how “choosey” people are when it comes to different activities, (i.e. how willing they are to travel for an activity and how likely they are of just choosing the closest). However, if the user does not wish to use this powerful feature of LUPTAI for an analysis run, they can perform accessibility analysis to the closest activity of the chosen activity type (and, thereby, ignoring exclusion probabilities).
The accessibility analysis to be performed can be changed from the Model Parameters tab of the Run Model Dialog, by toggling the Analysis Type drop down box. If “LUPTAI Accessibility Analysis” is selected, the model will use exclusion probabilities. If “Closet Accessibility Analysis” is selected, the model will not use exclusion probabilities.
Note
That when performing a “PT as an Activity” analysis, exclusion probabilities are not used. So “Analysis type” will have no effect for this activity.
For more information on exclusion probabilities see the How LUPTAI Works section of the technical documentation.
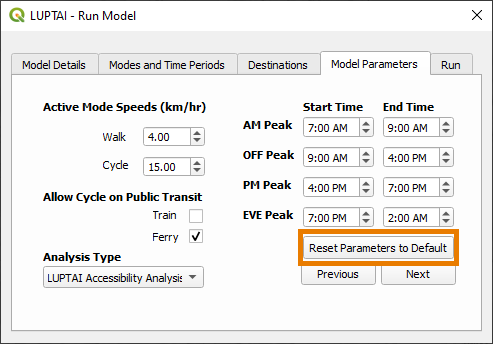
Changing Model Parameters
The LUPTAI QGIS Plugin allows the user to modify some basic model parameters that are used in LUPTAI’s accessibility analysis model runs. These are:
The active mode speeds (discussed below)
what PT modes allow bikes (discussed below)
the start and end time of time periods (discussed in Selecting Time Periods)
what type of analysis to perform (discussed in Changing Analysis Type)
If you accidentally change these while setting up a model run, the parameters can be reverted to their default by clicking Reset Parameters to Default button.
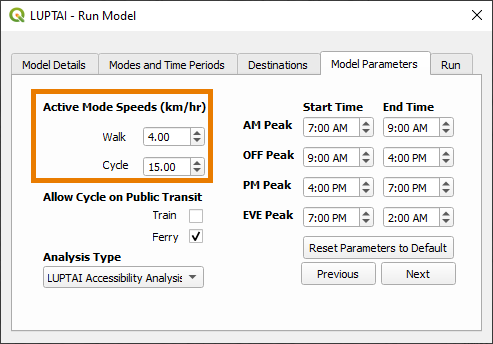
Changing Active Mode Speeds
The active modes can be changed in the Active Mode Speeds section of the Model Parameters tab. By default the walk speed is 4km/hr and the cycle speed is 15km/hr, which are fairly representative. For a typical accessiblity analysis we do not recommended changing these by greater than 66% in either direction.
Note
The speed that cycles travel is changed by a factor based on road type. Typically, the speed is greater on dedicated bikeways and slower on shared roadways. The parameters that modify these can be changed when using the API, by editing the the model parameters.
Allowing Cycle on PT
In many jurisdictions cycles are allowed on ferries and trains, often depending on time of day. To accommodate this LUPTAI allows you to select whether cycles should be allowed on these modes of PT when performing a public transport accessibility analysis with cycle as the egress. This option is available in the Allow Cycle on Public Transport section of the “Model Parameters” tab. Checking the checkbox next to Ferry or Train allows cycles on ferry or train, respectively.
Launching a Model Run
To launch a model run, click “Run” on the Run tab of the Run Model Dialog. However, prior to running the user needs to have specified the following options in the Run Model Dialog:
scenario that the model run is for
the results name
- at least one mode selected
if Public Transport is selected, at least one public transport mode
at least one Time Period selected
- at least one of either:
a General Activity selected
an Employment attribute selected
PT as activity selected
the Conditions of Use on the Run page to be read and accepted
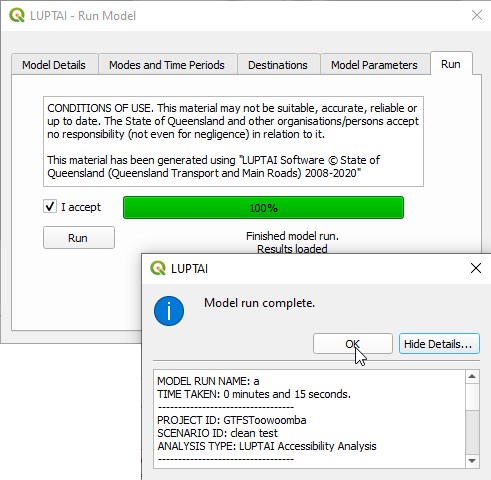
When the run starts, the first step is the exporting of data for the model run. This can take a few moments, depending on the size of the networks used and PC used. Next the actual model runs commence, the progress can be followed in the LUPTAI Model Progress Window, which pops up automatically when the model is running.
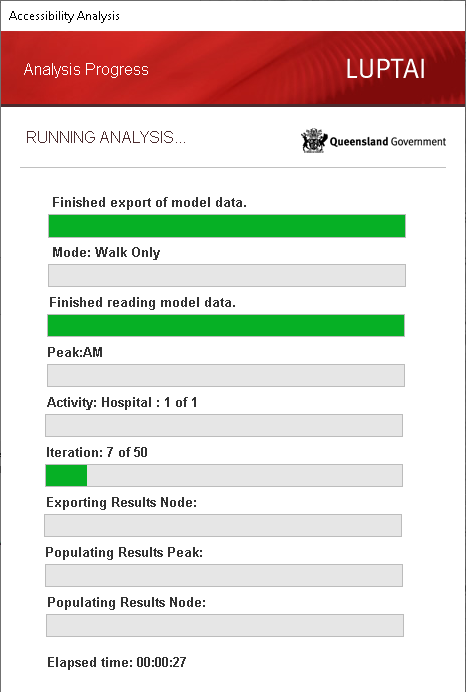
Note
A single “model run”, can actually perform several model runs, one for each mode and time period pair, walk to PT and cycle to PT are also separate model runs.
Finally the results are imported back in to the QGIS, where a confirmation dialogue confirms the contents of the model run. Users can now begin to explore the results of a QGIS model run, for more information on this, see Visualising Results.