Importing Model Data
A LUPTAI scenario is made up of up to four key data sources:
Active transport network, consisting of roads, pedestrian pathways and cycleways
- Public transport network, allowing accessibility via PT to be measured,along with accessibility to PT services
Activity points, representing destinations to measure accessibility to
Demographic information, used to measure accessibility to employment opportunties
At a minimum, a scenario must contain the base active transport network and one one of the other input source to measure accessibility to, most commonly activity points. See Selecting Destinations for how each data source can be used as an accessibility destination.
Under the Import Data submenu of LUPTAI, there is an option corresponding to each of these inputs. We now discuss each of these imports in a little more detail. This discussion assumes you’ve successfully loaded an existing scenario or created a new one (see the quick start guide if you haven’t). If you’ve done this right, the items in the import menu should be selectable and not greyed out.

Active Transport Network Import
Let’s have a look at the features of the active transport import dialogue from top to bottom.
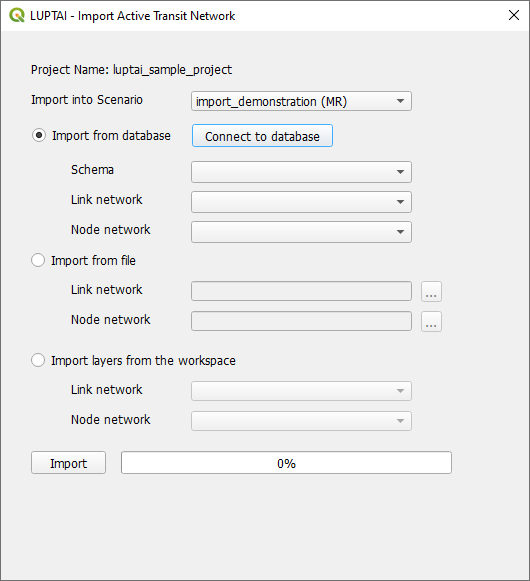
First, we can see the name of our project luptai_sample_project
in this case, and a dropdown for the scenario we would like to import into
(showing its name and the author).
Here, we’ve just created a brand new scenario import_demonstration which is
selected by default. We have a selection of three import data source types,
to select from, before the “Import” button, which begins the import procedure.
Import from database
The first option is to import network information from TMR’s LBase series of databases. If you’re an external user of LUPTAI and recieved a pre-packaged series of inputs, have a look at importing from file instead.
We now proceed assuming you have connection details and a login for the current year
luptai20xx database (if you are obtaining access permisssions, you may also want to make sure you have
permission to access one of the PTM databases, and the luptai base database,
as these are used for the other imports).
Pressing the “Connect to database” button, you will see a window like the following (which may be populated with default connection details to the luptai2021 database)
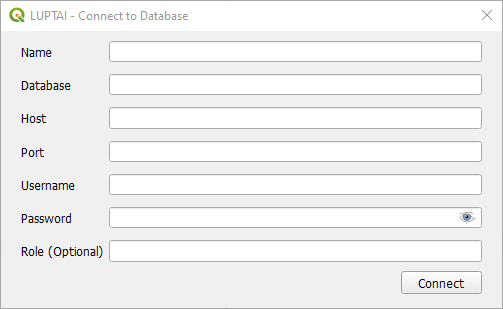
Enter your details and if connection is successful, the schema field of the import dialogue will populate, with a list of schemas in the database. Note that the “role” field is not strictly required, but if you have been provided a role as part of your credentials you should supply it, otherwise you may not be able to access all the schemas you expect.

Each schema corresponds to a model release for a particular LUPTAI regional mode. Here we populate the SEQ Reference release, selecting network links and nodes as appropriate.
Import from file
LUPTAI links and nodes can also be imported from a TAB file from the local file system, provided all the requisite information is present. If you have a pre-packaged release of LUPTAI, the provided links and nodes will already be in the correct format. If you are looking to import custom links and nodes, have a look at the LUPTAI scenario structure documentation.
Import from workspace
You can also import the luptai links and nodes from appropriate layers in the workspace. The links and nodes dropdowns populate with all QGIS layers of LineString and Point geometry types respectively.

The data requirements for importing from the workspace are very similar to those from file, the correct fields must be specified - as per the data format documentation. This allows one to prepare data directly in QGIS and iteratively update the layer until it is in the right format. It also provides a means to import from a GeoPackage or shapefile - by importing these into QGIS and then using the import from workspace option.
Importing from the workspace also allows a more direct workflow if one wants to construct scenarios with a series of network edits. Network links and nodes can be imported and modified using the standard QGIS tooling (making sure data fields such as link length are updated appropriately). The modified networks can then be imported directly using the import from workspace option.
Running the import
Once you have completed any of these processes, press the import button to begin processing the data. This will start the import process, which will trigger updates in the progress bar as key stages are reached. If the import is successful, the progress bar will appear as follows.

At this point, you are free to close the dialogue, and should be able to see the network links in the main QGIS view (nodes are set to not visible in the workspace by default). If you had not already loaded the select scenario, a corresponding group will appear in the QGIS workspace and a basemap will be loaded. The link layers are stylised according to the link type specified in the data.
If you are preparing multiple scenarios you can continue to import active transit networks within the dialogue by selecting another scenario from the dropdown. Notice how the import button is greyed out after an import. This is to prevent accidentally importing the same data twice. However, selecting a different scenario will re-enable the import button.
Note
The base active transport network is critical to LUPTAI working correctly. After any additional data sources (PT, activity points, activity attributes) are imported, the active transport network for a scenario becomes read only. This is due to the network snapping process which occurs to link data sources to the base network. To change the active transport network within a scenario, you should instead create a new scenario (and optionally delete the old scenario file).
Public Transport Network Import
Note
You must import an active transport network prior to importing a public transport network. The active network forms the base network in LUPTAI, and public transport information is attached to this network.
Similarly to active transport, there is more than one import data source for public transport networks.
The first source is to use the TMR PTM database to source a public transport dataset. The second is to import PT from a (static) GTFS zip file.
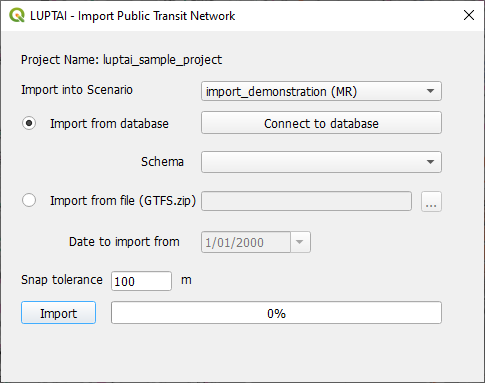
Import from PTM
Connecting to PTM is analogous to connecting to the luptai20xx databases for the active transit network. After connecting, a list of schemas will be populated:
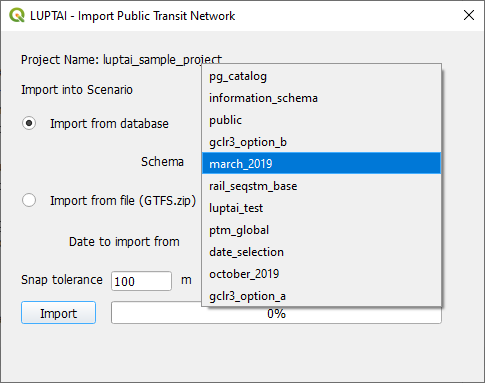
In the PTM database, each schema corresponds to a PT scenario. However, the PTM codebase is designed to allow combinations of data sources with complex replacement rules, using a series of post processing steps on disk after downloading from the database. For the simplified GUI import in LUPTAI QGIS, this is not feasible, so the PTM import follows a series of implicit rules, designed to cater to most scenarios. For specialist/ complex use one should consult with the PTM team.
The data source resolution steps are:
If the
networks_transit_routestable of the specified schema has a single data source containing the string"gtfs", it is declared the base data source.If the
networks_transit_routestable of the specified schema does not have any data sources containing the stringgtfsbut has a single data source containing the string"remix", it is declared the base data source.If the scenario does not have a base data source declared at this point it cannot be automatically processed. This means that all data sources are imported and it is up to the modeller to manually disable any conflicting/ undesired services by modifying the
pt_linksattribute table as appropriate.Otherwise, all remaining (potentially none) remix data sources are defined as overrides to the base data source. This means that if any combination of
(route_short_name, time period, direction_id)conflict. The base source is removed. For cases where there is no conflict, the remix entries are added to the base data sourceIf any railsys (rsx) data sources are present, the heavy rail mode (r) of the base data source is removed and the railsys data sources are added. That is, the railsys sources are treated as a network wide replacement of the heavy rail mode.
Import from File
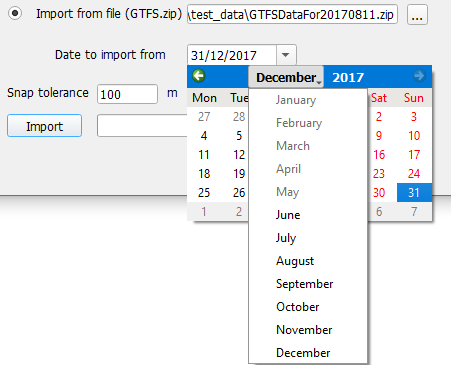
The second PT import option is to import from a (static) GTFS for a given day. After selecting a GTFS File from the file system, the date picker field is populated, only allowing selections between the minimum and maximum date range of the supplied GTFS. A day besides Sunday on which services actually occur must be selected to be imported.
Note
(Advanced usage - Calibration Module) Note that pt trip distances computed using the GTFS import are straight line distances between stops. Importing from PTM uses the length from PTM, which uses the geometry of the linestring segment and is subsequently more accurate.
Running the import
The final step in the PT import process to specify a snapping tolerance for the import process (or to use the recommended default). This process is to align the imported PT network with the underlying active transport network used in LUPTAI. For more details on the meaning of snap tolerance, see the “What is Snap Tolerance?” section or the hover tooltip in the plugin.
Now, press the import button to begin processing the data. If the import is successful the progress bar will reflect this accordingly, and the visualisation of the PT routes will be displayed in the main window of QGIS.
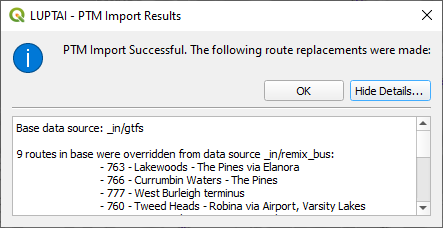
If the PTM data source is used and any data source resolution was performed, the number added/ altered routes will be listed in a dialogue on completion of the import.
Note
Note that the PT import is not intended to be editable in LUPTAI QGIS. One should instead use another tool such as Remix to edit prior to import, or the LUPTAI ArcGIS power user version which supports PT editing.
Nonetheless, one may have mild success by filtering the pt_stops
table using a series of appropriate spatial operations and disabling the
corresponding nodes. This functionality is not explicitly supported.
Warning
Geospatial editing of PT data is not supported in LUPTAI QGIS. Modifying the location of stops or routes will have no effect on the output of LUPTAI, LUPTAI uses a timetable based PT data source, so altering distances will not propagate to the underlying timetable. Additionally, manually adjusting the geographical position of stops will not update the network snapping.
Activity Points Import
Note
You must import an active transport network prior to importing a activity points. The active network forms the base network in LUPTAI, and public transport information is attached to this network.
There are two import sources for activity points, the TMR luptai databases and from file.
Import from Database
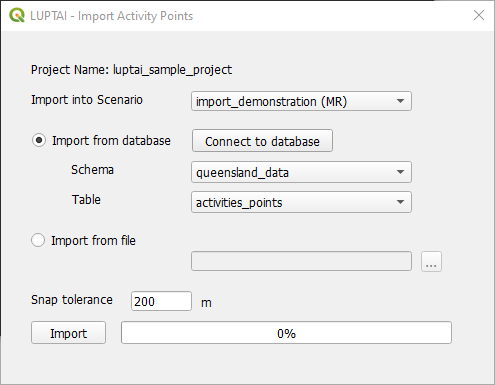
Activity points are stored on the luptai20xx databases, and may contain updates
year on year. As pictured, they typically will be found in the
queensland_data schema as they are stored as a state wide dataset.
Import from File
The input file formats for activity points are TAB files and a LUPTAI sqlite scenario file. The former provides an interchange format if one wants to compile custom activity point data, whilst the latter facilitates copying activity points from one scenario file to another. Importing from a scenario file also facilitates the modification of activity point locations in QGIS, as importing from a scenario file will refresh the snapping.
Note that if you are supplying custom activity points, they do not need to have queenland wide coverage, they simply should cover the extent of the links and nodes network.
Warning
Geospatial editing of Activity Point data will not directly affect the output of LUPTAI QGIS. For the new position of activity points to be updated properly in the model, they must be re-imported using the Activity Point -> Import from File option to refresh the network snapping information (note this potentially could be importing from the same scenario that is being edited in the QGIS main window).
Deletion of activity points will take immediate effect (without a re-import), as will enabling/ disabling activity points.
Running the import
After specifying a data source, snap tolerance must be specified before pressing import to start the procedure. When it is complete, if there are an activity points which are not snapped you will see a dialogue similar to the following:

Note that a large number of failed snaps does not necessarily indicate a problem. The activity point layer on the database is state wide, so if you are running a regional model, then we would expect a majority of points to fall beyond the model region.
Snap tolerance is particularly important for activity points as it controls the level of accuracy at which activity points are included into the model, and the exclusion of those which fall too far away from the network. Given this, there are in built tools to help visualise the effect of snap tolerance - allowing you to re-import your activity points at a different tolerance if needed.
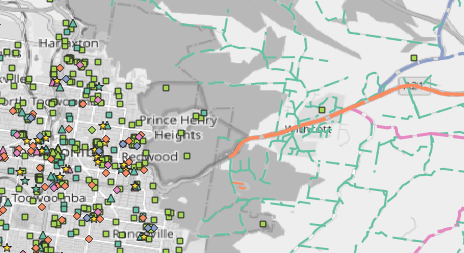
After importing activity points and expanding the Activity Types layer in the workspace we see the following:
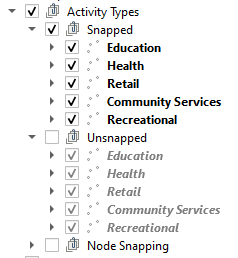
By default, all the activity points in use are visible, while those discarded are set to invisible. If we invert this selection however, we can see that all the activity points outside the model region are unsnapped - along with some of those inside (in this case open spaces, which are beyond 200 metres from the nearest node in the the active transport network)
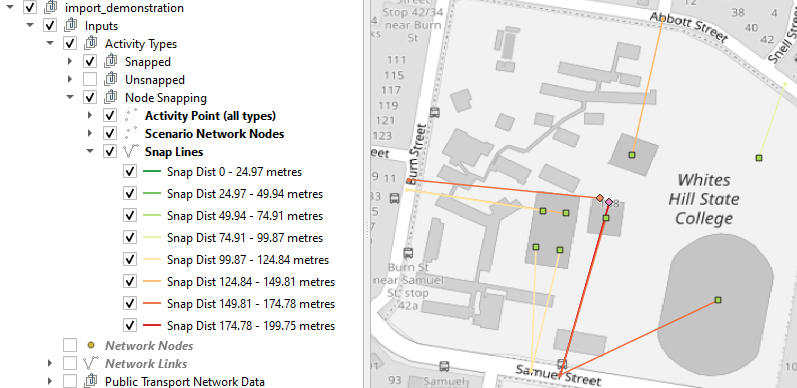
In addition to the unsnapped points, it is also worthwhile examining how close the snapped activity points are to their counterpart nodes in the active transport network. There is a compromise here between important activity points being excluded as they are more than the snap tolerance (200m ) from the nearest node, and the accessibility analysis being inaccurate, as activity points are upto 200m away from where LUPTAI measures to. This is best illustrated by an example, the following has the node snapping layer enabled, which stylises activity points by their distance from there corresponding network node. We look at Whites Hill State College and the associated activity points. Here we can see that the school itself (pink diamond) is 150-200m from the nearest node, so if the snap tolerance was reduced, these important points may be excluded. Conversely, if the school was 450m from the nearest road and we set the snap tolerance to 500m, then other activity points may be inaccurate by up to 500m.
If a balance cannot be found, manual editing of the activity points may then be required. The snapping tool can also be used to investigate where manual editing should be performed. For example, the import could be run with a snap tolerance of 2000m to easily identify points more than 1500m from the nearest network node. This could then be removed from the data or relocated to the appropriate location and the data could be imported again, with a lower snap tolerance.
For more details on the meaning of snap tolerance, see the “What is Snap Tolerance?” section or the hover tooltip in the plugin.
Activity Attributes / Employment Import
Note
You must import an active transport network prior to importing a activity attributes. The active network forms the base network in LUPTAI, and public transport information is attached to this network.
The import process for activity attributes is very similar to activity points. Again there are two data sources, database and from file.
Import from Database
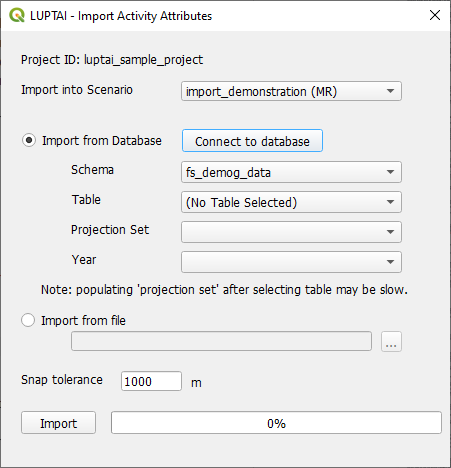
Activity attributes are are stored on the base luptai database (no 20xx suffix),
and contain demographic projections for employment sourced from the TMR demogs
database. This information is stored as a foreign schema fs_demog_data on
the luptai database. The projections_sa1 table should be selected.
After selecting the table, the list of contained projections will be populated.
Note that this may take up to a minute to be computed, as there are millions of
records in the table. After selecting a projection set, the desired year should
also be selected.
Import from File
In the same was as activity points, activity attributes may be imported either from a TAB file, or a LUPTAI sqlite scenario.
Running the import
In the same way as other imports, select a snap tolerance and press import. Note that the activity attributes are a single representative point (manually adjusted centroid) per SA1. As such, the snap tolerance is necessarily much higher as this does not correspond with a street address and thus may not align with the active transport network.
For more details on the meaning of snap tolerance, see the “What is Snap Tolerance?” section or the hover tooltip in the plugin.
What is Snap Tolerance?
Snap tolerance is the parameter controlling the attachment of the various import data sources to the active transport network which LUPTAI uses as a base data source. For simplicity, we’ll call this the base network.
Put simply, each point in an incumbent data source needs to be
mapped to a nearby point in the based network to be seen by LUPTAI, otherwise it is
ignored by the model. The snap tolerance is the distance around a PT stop/
activity point/
activity attribute that is searched to find a point in the base network.
If points are found, the new point is identified with the nearest node and the
corresponding node id is attached to the new point. If no nodes are found, the
point is unsnapped and it receives the node id -1.
Note that the snapping performed does not make geospatial alterations. All points are shown at their original position when viewed in QGIS. This is so that they can be easily identified with the underlying, real world data they represent.
This is why adjusting the position of PT stops or activity points will not affect the model, as their position is not used. It is the position of the nearest node (identified through the snapping process) that is used by the model.
In the case of activity points, there is an additional post-snapping procedure implemented to handle the high number of open space recreation points in the new LUPTAI datasets. Once all open space points have been snapped to a node, these points are filtered so that there is at most one recreation activity point per node. In cases where multiple recreation activity points have been snapped to a node, only the closest point is kept. All others recieve a node id of -2 to indicate that they have been disabled. These points are loaded into the “Excluded (Point Density)” tab of the activity types group in the QGIS workspace.
Power User Notes - Saving database connection credentials
When performing multiple database imports it may be convenient to have database credentials persist through the database import dialogues. Due to the structure of the TMR databases it is not possible to save a single database connection for reuse across all imports. Despite the credentials being the same, the databases are distinct, so separate connections are needed.
To spawn multiple connection from a single set of credentials, plaintext username and password would need to be stored temporarily which is a security risk.
Warning
The following procedure makes compromises regarding credential security and ease of used. The associated security risk of storing credentials in a plaintext file must be understood and excepted before proceeding.
To allow the convenience of persistent credentials to users users where it would be of significant benefit there is a manual overide that can be specified at the user’s own risk.
To have your credentials persistent as the default database connection information:
Navigate to the directory where you installed the QGIS plugin in windows explorer (by default this will be
%APPDATA%\QGIS\QGIS3\profiles\default\python\plugins\luptai_from_installer, pasting this into windows explorer will expand%APPDATA%to the appropriate path).Now open the imports folder and open
default_connections.jsonin a text editor (notepad++, vscode, …). You will see a series of entries similar to the following, one for each of the database imports.
"active_and_road_network": {
  "name": "Luptai 2021",
  "database": "luptai2021",
  "host": "<db_connection_path>",
  "port": "5432",
  "default_schema": "seq_reference",
  "username": "",
  "password": "",
      "role":""
},
Make a copy of the file to restore in case you make errors in editing the fields (which may crash LUPTAI QGIS if you invalidate the json data format).
Simply fill out each of the username and password fields as appropriate, putting your text inside the double quotes, e.g.
"active_and_road_network": {
    "name": "Luptai 2021",
    "database": "luptai_2021",
    "host": "<db_connection_path>",
    "port": "5432",
    "default_schema": "seq_reference",
    "username": "my_username",
    "password": "abc123"
    "role":"my_postgres_role"
},
Note that this can also be user to adjust the default schema you wish to connect to, e.g. connecting to luptai_2022 instead of luptai_2021.